Main Course Recipes

Easy Egg Fried Rice Recipe | Easy Fried Rice Recipe With Egg

Easy Homemade Egg Fried Rice Recipe

Oh, so delicious! These are truly mesmerizing words that come to mind when savoring a bowl of egg fried rice. The dish is a perfect blend of simplicity and flavor, a timeless comfort food that feels like home with every bite. This egg fried rice recipe is simple yet incredibly satisfying, packed with flavors that hit just the right notes. The blend of fluffy rice, savory eggs, and a burst of umami from the sauces can perfectly capture anyone’s taste buds.

Ingredients Of Egg Fried Rice

Bringing together the right ingredients is the first step to cooking perfect egg fried rice. You don’t need anything fancy in the egg fried rice recipe, just a handful of pantry staples and a few fresh items come together to create a flavorful, satisfying meal.

  • Rice 650gm
  • Eggs 3
  • Oil Half Cup
  • Band Gobi (Cabbage) 1
  • Gaajar (Carrot) 2 Big
  • Hari Pyaz (Green Onion) 1/2 Cup
  • Cheeni (Sugar) 1 TBSP
  • Namak (Salt) 2TSP or to taste
  • Sirka (Vinegar) 1 TBSP
  • Soy Sauce 1 1/2 TBSP
  • Chili Sauce 1 TSP
  • Chicken Cube 1
  • Kali Mirch Powder (Black Pepper Powder) 1 TBSP
  • Safaid Mirch Powder (White Pepper Powder) 1 TBSP
  • Safaid Till (Sesame Seeds) 1 TBSP

How To Make Easy Egg Fried Rice

Boil The Rice

For this egg fried rice recipe, we just need to take a saucepan and boil the rice, just like we do on regular days. Let it cool for a bit to avoid it being too sticky.

Scramble The Eggs

In a bowl add eggs, a pinch of salt, and 1/4 tsp of black pepper powder. whisk them nicely.

In a wok, heat a bit of oil on low to medium heat. Pour in the beaten eggs and scramble them until they are fully cooked.

Remove from the wok and set aside for later use.
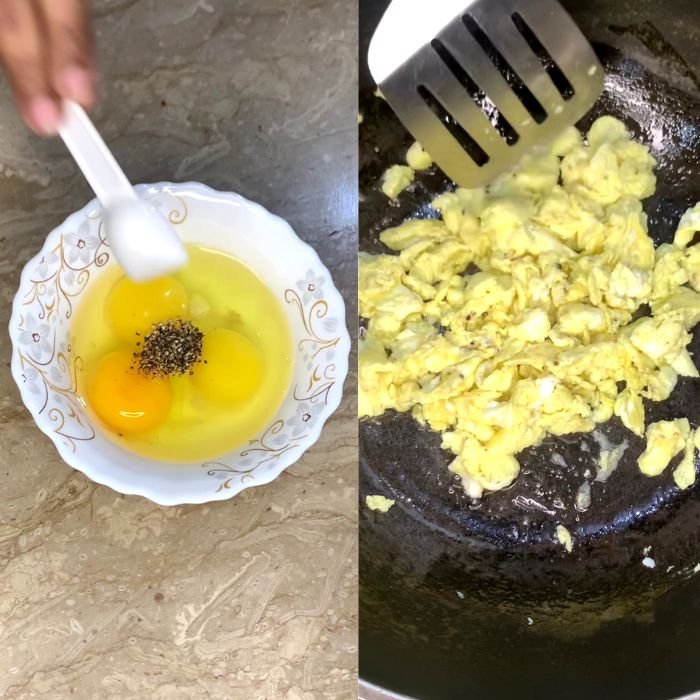
Scrambling the eggs for egg fried rice

Saute Vegetables

In the same wok, heat a bit of oil again and add the chopped vegetables. Saute them on medium heat until they are cooked and tender crisp.
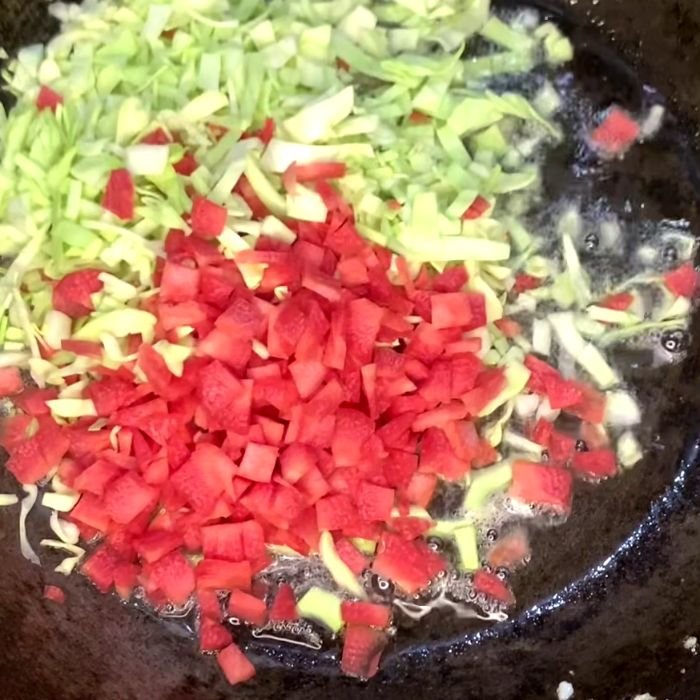
Seasoning

After cooking veggies, drizzle soy sauce, chili sauce, and vinegar in it. Season some salt, black pepper powder, white pepper powder, and chicken stock. Stir them well to coat evenly.
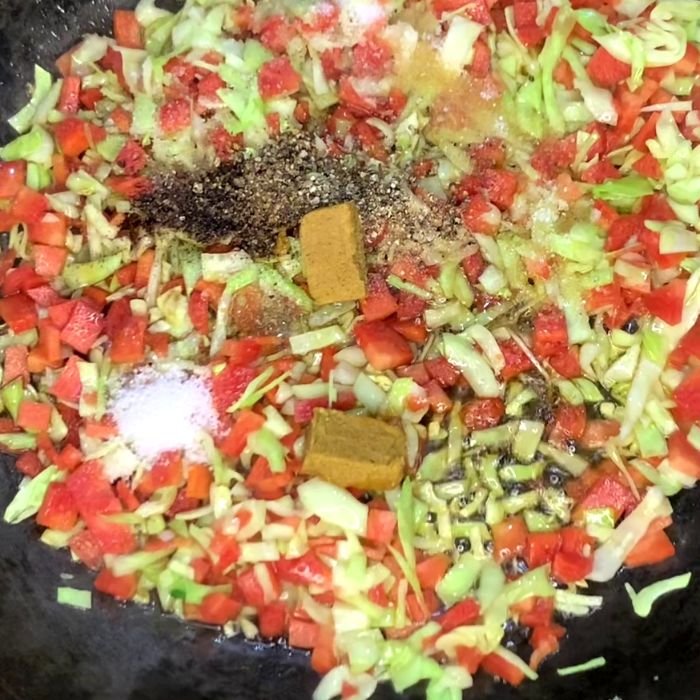
Seasoning Vegetables for egg fried rice

Add Garnishing

Fold in the scrambled eggs, chopped green onions, and sesame seeds (or oil).
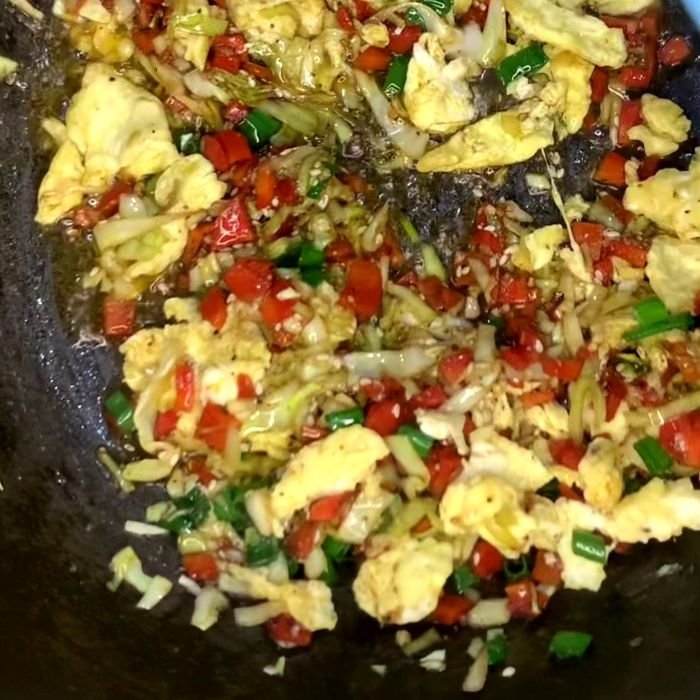
Add Garnishing

Combine Rice

Add cooked rice to a wok with vegetables and toss everything together in a gentle way, breaking up any rice clumps. Cover the lid and steam the rice for 5 mins. After steaming (Dum) mix everything again thoroughly.
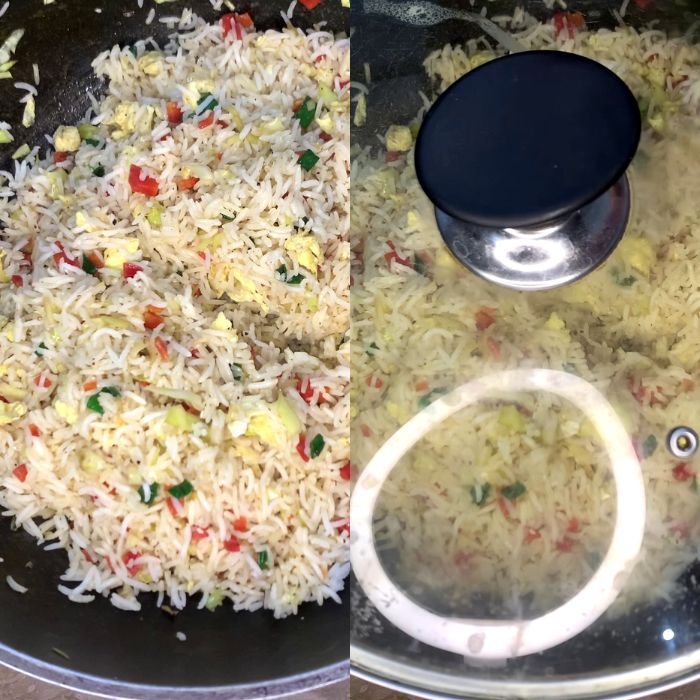
Combine Rice with Vegetables and Eggs

Serve And Enjoy

Serve these mouth watering easy egg fried rice in a bowl and garnish with some more green onions and sprinkles of sesame seeds, and enjoy the perfect homemade comfort food.

Egg Fried Rice Recipe

Variations

There is something undeniably comforting about egg fried rice. Perfect for a quick weekday dinner or a lazy weekend lunch. Kids love them a lot, and picky eaters can’t say no to this dish. This easy egg fried rice recipe is not only easy and quick to make but also customizable.
Got leftover rice and some stray veggies lurking in the fridge? Prefect! just toss them in, add seasonings and here you are ready to take your leftovers to the next level.
Feel free to add in your favorite protein boost like chicken, shrimp, or tofu.

FAQs

Can I skip the chicken cube in the recipe?

Yes, you can skip the chicken cube if you prefer a vegetarian version. To maintain flavor, consider adding a bit more soy sauce or vegetable stock powder.

What type of rice works best for egg fried rice?

Long-grain rice or jasmine rice, preferably day-old and chilled, works best because it’s less sticky and fries better without clumping.

Why do we add sugar to fried rice?

A small amount of sugar helps balance the savory flavors from the soy sauce, vinegar, and spices, adding a subtle depth to the dish.

Can I use other vegetables besides cabbage and carrots?

Absolutely! You can add bell peppers, peas, corn, or even mushrooms for added flavor and texture.

How do I prevent the rice from becoming soggy?

Use cold, day-old rice. Stir-fry on high heat to quickly evaporate moisture and keep the rice grains separate.

Is vinegar necessary in egg fried rice?

Yes, a little vinegar adds a slight tanginess that enhances the overall flavor. If you prefer, you can substitute it with lemon juice for a similar effect.

What’s the purpose of sesame seeds in fried rice?

Sesame seeds add a subtle nutty flavor and a slight crunch, enhancing the texture of the dish and Of course they are healthy too.

Can I make it spicy?

Yes, you can adjust the spice level by increasing the chili sauce or adding fresh green chilies for extra heat.

You May Also Like. . .

Easy Egg Fried Rice Recipe

This flavorful egg fried rice is made with long-grain rice stir-fried in oil, combined with fresh vegetables like cabbage, carrots, and green onions. Seasoned with soy sauce, vinegar, chili sauce, and a blend of black and white pepper, it offers a perfect balance of savory, tangy, and mildly spicy flavors. A hint of sugar adds subtle sweetness, while sesame seeds provide a nutty crunch. The dish is quick, easy, and perfect as a main course or a side for any meal.
Prep Time15 minutes
Cook Time20 minutes
Total Time35 minutes
Course: Main Course
Cuisine: Chinese
Keyword: Asian Fried Rice Recipe, Egg Fried Rice Recipe, Fried Rice with Vegetables, Homemade Egg Fried Rice, Quick Fried Rice Recipe
Servings: 6 People

Ingredients

  • 650 gm Rice
  • 1/2 Cup Oil
  • 1 Cabbage (Band Gobi)
  • 1 Carrot (Gaajar)
  • 1/2 Cup Green Onion (Hari Pyaz)
  • 1 TBSP Sugar (Cheeni)
  • 2 TSP Salt (Namak)
  • 1 TBSP Vinegar (Sirka)
  • 1 1/2 TBSP Soy Sauce
  • 1 TSP Chili Sauce
  • 1 Cube Chicken Cube
  • 1 TBSP Black Pepper Powder (Kaali Mirch Powder)
  • 1 TBSP White Pepper Powder (Safaid Mirch Powder)
  • 1 TBSP Sesame Seeds (Safaid Till)

Instructions

  • Begin by boiling the rice in a saucepan as you normally would. Once cooked, allow it to cool slightly to prevent it from becoming too sticky during frying.
  • Crack the eggs into a bowl, add a pinch of salt and ¼ teaspoon of black pepper powder, and whisk well.Heat a little oil in a wok over low to medium heat, pour in the beaten eggs, and scramble until fully cooked. Remove from the wok and set aside.
  • In the same wok, add a bit more oil and toss in the chopped vegetables. Sauté over medium heat until the veggies are tender yet still crisp.
  • Once the vegetables are cooked, pour in the soy sauce, chili sauce, and vinegar. Season with salt, black pepper, white pepper, and add the chicken cube (crumbled). Stir well to coat the vegetables evenly with the seasoning.
  • Add the cooked rice to the wok and gently toss everything together, making sure to break up any clumps for an even mix.
  • Fold in the scrambled eggs, chopped green onions, and sesame seeds (or a drizzle of sesame oil). Cover the wok with a lid and let the rice steam for about 5 minutes. After steaming, give it a final gentle mix to combine all the flavors.
  • Transfer the delicious egg fried rice to a serving bowl, garnish with extra green onions and a sprinkle of sesame seeds, and enjoy this comforting homemade dish!

Video

Easy Shalgam Ki Sabzi Recipe | Shalgam Ki Bhujia

Shalgam Ki Sabzi Recipe

Shalgum (turnips) are not just a vegetable; they are a wonderful treat of winter’s bounty, known for their earthy and subtly sweet taste with warming qualities, often preferred for dishes like shalgum ki sabzi. When running out of time, this simple recipe of shalgam ki sabzi is perfect for lunch, giving a rich blend of flavors and nutrition with its soft and creamy texture.

Shalgum ki sabzi is a winter staple food in South Asia, especially in Pakistan and India. In Pakistan, it is known as shalgum ki sabzi, while in India it is called shalgam ki bhujia. No matter what the name is, the process of making shalgam ki sabzi recipe is nearly the same. It is dry sabzi made with a generous amount of onions, tomatoes, and a handful of aromatic spices.

Ingrediants of Shalgam ki Sabzi

  • Oil 1/2 Cup
  • Shalgam (turnip) 1/2 Kg
  • Chopped Onion 2 Medium
  • Chopped Tomatoes 2 Medium
  • Chopped Garlic 4 Cloves
  • Chopped Green Chilies 2 Tsp
  • Chopped Cilantro 2 Tsp
  • Crushed Red Chili 2 Tsp
  • Cumin 2 Tsp
  • Turmeric Powder 1/2 Tsp
  • Salt 2 Tsp (or to taste)
Shalgam Ki Sabzi Ingredients

How To Make Shalgam ki Sabzi (Step by Steps)

The best part of the shalgam ki sabzi recipe is that the shalgam becomes so tender and creamy after cooking, absorbing spices and flavors beautifully.

1. Boiling Turnip for Shalgam Ki Bhujiya

Wash the shalgam thoroughly; they are root vegetables and may have soil on their skin.

Peel the skin, and cut them into a small cube shape.

In a saucepan, add the cubed shalgam and pour water over them, until they are well covered with water.

Add 1/4 tsp of turmeric powder and let them boil on medium heat.

Once the water comes to a boil, reduce the heat, cover with a lid, and simmer until the shalgams are properly cooked.

(You can check the shalgum by using a fork or knife. If the fork is passing smoothly, it means that shalgums are fully cooked. And if they are still hard and water is running out, you can add little more water untile they are properly cooked).

Boiled Shalgam

Once done with cooking, dry out all the excess water.

Boiled Shalgam After Water Strain

Transfer the shalgam to a plate. Mash them thoroughly until a smooth texture forms, like mashed potatoes.

2. Preparing Shalgam Ki Bhujiya

Heat oil in a pot. Once the oil is heated, add the chopped onions and saute them on medium heat until they change color and become translucent. Then, add the chopped garlic and saute them well, until the rawness of the garlic fades and they become light golden.

Frying Onion and Garlic in Oil

Now at this point add cumin and saute them for a few seconds as it makes a crackel sound.
(It sounds funny but in a desi way it’s called zeera karkarana or chutar putar)

After this point when cumin makes a crackel sound add tomatoes and saute them thoroughly.

Add crushed red chilis, turmeric powder (1/4 tsp), and salt to the pot and mix everything well. Lower the heat and let the tomatoes cook for 5 minutes so that they become soft and tender.
(There is no need to add water, as tomatoes will release their own moisture)

Adding Tomatoes

Once tomatoes are soft and tender add green chilies and coriander in it. Give them all a nice stir and add mashed shalgams in a pot.

Add Green Chili, coriander, and mashed shalgam

Now rise the heat and saute mashed shalgams properly in tomato mixture. As the oil starts to release, lower the flame and cover the pot with the lid. Let the shalgum ki sabzi simmer for 5 minutes.

Off the flame and we are all set to serve the mouth watering, creamy, soft, and full of flavor Shalgum ki sabzi.

FAQs

What is Shalgam ki Sabzi?

Shalgam ki sabzi is a traditional South Asian dish especially in India and Pakistan, made from turnips (shalgam). This sabzi is a winter staple in Punjabi households, enjoyed as a winter comfort food. It is cooked with a mix of spices, tomatoes, garlic, and onions. Served with roti, naan, makki ki roti, or steames rice.

Is Shalgam ki Sabzi a healthy dish?

Yes, shalgam ki sabzi is made from turnips, which are low in calories and high in fiber, minerals, and vitamins. It is a comfort filled food with packed antioxidants that keep your gut system healthy, providing you warmth in winter.

How spicy is Shalgam ki Sabzi?

Shalgams are best at absorbing flavors. It is mildly spicy but, the spice level can be adjusted to your taste. It depends on how spicy a person wants.

What’s the best way to store leftover Shalgum ki Sabzi?

Shalgam ki sabzi can be stored in a refrigerator in an air tight container for up to 2 to 3 days. You can reheat on the stovetop or in the microwave before serving.

What can I serve with Shalgam ki Sabzi?

Shalgum ki sabzi pairs well with makki ki roti or desi ghee ka paratha. It can also be served with roti, naan, or steamed rice. for a wholesome meal, it can be served with fresh salad, garlic raita or plain yogurt as aside dish.

You May Also Like. . .

Shalgam Ki Sabzi Recipe

Shalgam ki Sabzi is a hearty and nutritious Indian and Pakistani dish made with turnips as the main ingredient. It features a blend of spices like cumin, turmeric, and coriander, along with onions, tomatoes, and garlic for a rich, savory flavor. Often cooked in a pressure cooker or pan until the turnips are soft and infused with spices, this dish is a winter favorite. It's typically enjoyed with roti, paratha, or steamed rice and is cherished for its warming and comforting qualities.
Total Time30 minutes
Course: Main Course
Cuisine: Indian, Pakistani
Keyword: easy, quick, Shalgam ki sabzi, shalgam ki sabzi recipe
Servings: 5 People

Ingredients

  • 1 Cup Oil
  • 1/2 KG Shalgam (Turnip)
  • 2 Chopped Onions
  • 2 Chopped Tomatoes
  • 4 Cloves Chooped Garlic
  • 2 TSP Chopped Green Chilies
  • 2 TSP Chopped Coriender
  • 2 TSP Crushed Red Chili
  • 2 TSP Cumin
  • 1/2 TSP Turmeric Powder
  • 2 TSP Salt

Instructions

Boiling the Turnip

  • Wash, peel, and dice turnips into small cubes.
  • In a saucepan, add cubed turnips, water (enough to cover), and 1/4 tsp turmeric powder.
  • Boil on medium heat; then simmer until turnips are tender (check with a fork).
  • Drain excess water and mash turnips until smooth, like mashed potatoes.

Preparing the Bhujia Base

  • Heat oil in a pot, sauté chopped onions until translucent.
  • Add chopped garlic and cook until golden.
  • Add cumin seeds; sauté until they crackle.
  • Mix in chopped tomatoes, crushed red chilies, 1/4 tsp turmeric, and salt.
  • Cook on low heat for 5 minutes until tomatoes are soft.

Combining the Ingredients

  • Add green chilies, cilantro, and mashed turnips to the pot.
  • Cook on high heat, stirring until oil separates.
  • Cover and simmer on low for 5 minutes.

Serving Suggestions

  • Serve hot with makki ki roti, paratha, naan, or steamed rice.
  • Pair with plain or garlic raita and a fresh salad for a wholesome meal.

Video

FAQs

Pakistani Beef Yakhni Pulao Recipe

Beef Yakhni Pulao Recipe

Pulao!… Oh, wow!
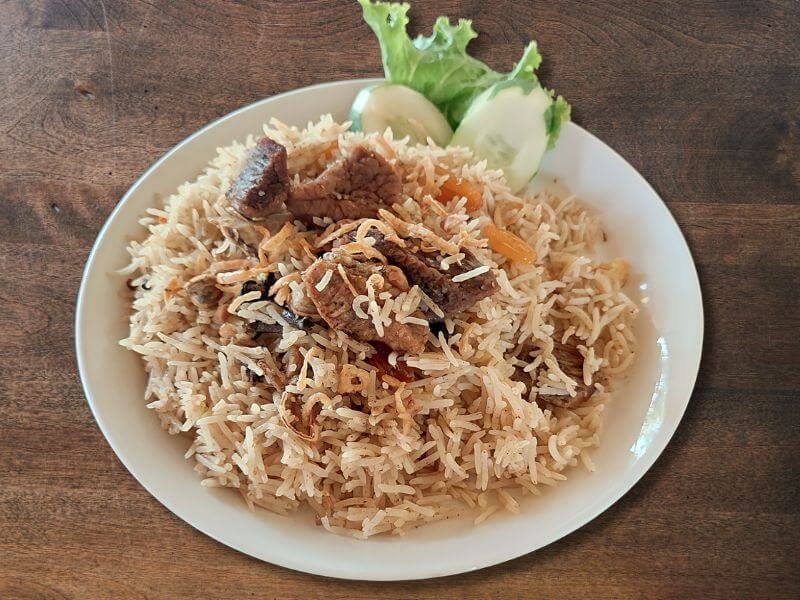
This is an instant expression when you hear it’s a pulao day. Yakhni pulao is an old-school dish. People of all ages love this traditional dish. Beef yakhni pulao is a famous festival dish in Pakistan. Following this Beef yakhni pulao recipe will lead you to an amazing and juicy rice main course that you will definitely never forget.

What is Beef Yakhni Pulao?

Pulao is a flavorful rice dish that is commonly served as a main course. Beef Yakhni Pulao is a variation of pulao where rice is cooked with meat broth (Yakhni), along with a blend of seasonings and spices. This dish holds a special place in Pakistani cuisine, and while the beef yakhni pulao recipes may differ across regions, Beef Yakhni Pulao is the most popular variation compared to chicken or mutton pulao.

Traditionally, authentic Beef Yakhni Pulao consists of beef broth, rice, salt, and black peppercorns. However, to add more variety and enhance the flavors, spices are often incorporated into the dish, resulting in a delightful twist to the traditional beef yakhni pulao recipe.

Origin:

Pulao is a rice dish consumed mainly in Central Asia, South Asia, and the Middle East. Calling pulao an old-school dish has a reason. Cooking rice with the broth was introduced at the time of the Abbasid Caliphate and spread out vastly in Spain, Afghanistan, and eventually worldwide.

Beef Yakhni Pulao Recipe Ingredients

For making Beef Broth (yakhni);

  • Beef mix boti 1/2 Kg
  • Ginger garlic paste 1 1/2 Tbsp
  • Onions medium size 1
  • Water 1.5 Ltrs
  • Salt 1 Tbsp or to taste
  • Cloves (laung) 10
  • Cinnamon (Dar Chini) stick 1
  • Black Cardamom (Bari Ilaichi) 1
  • Black peppercorns (Kali Mirch) 1/2 Tsp
  • Fennel seeds (Saunf) 1/2 Tsp
  • Coriander seeds (Sabut dhania) 1/2 Tbsp
  • Cumin seeds (Zeera) 1/2 Tbsp
  • Bay leaves (tez Paat) 2

To Prepare Pulao;

  • Basmati Rice 1/2 Kg
  • Oil 1/2 cup
  • Onion medium size 1
  • Turmeric powder (Haldi) 1/2 Tsp
  • Coriander seeds (Sabut Dhania) 1/2 Tsp
  • Cumin (zeera) 1/2 Tsp
  • Fennel seeds (saunf) 1/2 Tsp
  • Green chili pepper 3
  • Yogurt (dahi) 1/2 Cup

Topping;

  • Mint leaves
  • Cilantro
  • Green chili pepper
  • Food color

How To Make Beef Yakhni Pulao?

We have distributed Beef Yakhni Pulao Recipe in 5 easy steps to make it more convenient for you to understand.

For making Beef Broth (yakhni)

For broth put whole spices (Cloves, Cinnamon stick, Badi Elaichi, Black peppercorns, Fennel seeds, Coriander seeds, Cumin seeds, Bay leaves ) in a muslin cloth and knot it tightly. This will help in infusing all the spices in broth without being mixed. You can also use an herb infuser if you have otherwise this method will keep your pulao clean and flavor full.

  1. In a saucepan to prepare the broth, add water, Beef, sliced onion, Ginger Garlic paste, and Salt.
  2. Add whole spices knotted in a muslin cloth and cover the lid. Let the beef cook on a low medium flame for 50-60 minutes or until the meat is done so that it is tender well and absorbs the flavor of spices. You can use a pressure cooker to prepare it in less time it will take (20-25) minutes to be done.
  3. Once the meat is tendered properly, discard the muslin cloth or remove the herb infuser if you are using it.
  4. Take off the meat in a bowl with a tong or slotted spoon from stock and set aside. Cook the remaining stock to reduce it until 3 cups are left and save it for later use. 

Soaking Rice for Pulao

Here we are using Basmati Rice for pulao. Remember to soak your rice according to the rice you are using.

  1. To clean the rice wash them thoroughly under running water in a strainer.
  2. Soak them in a bowl for 30 min. Take the amount of soaking water double then the rice you are using. 30 minutes is the best time to soak basmati rice.
  3. After the soaking process is completed, drain the rice so that all the starchy layer that was built on the rice naturally washes away. Keep drained rice aside for later use.

Combining Broth With Rice

Once you are done with the preparation of broth and soaking of rice, you are all set to make Beef Yakhni Pulao.

Roasting and chopping:

We add whole spices in broth just to infuse them in meat. Here in Bhunai, we are roasting coriander seeds, fennel seeds, and cumin. After roasting crush them and set aside. Take green chili peppers, chop them, and keep them aside as well.

Before we start making beef yakhni pulao, the most important thing to keep in mind is when you are making a rice dish make sure to use a pot that is wide and large it will make rice puffy. Use a heavy base pot so that rice does not stick at the bottom and cooks evenly.

  1. In a pot, add oil and let it heat so the rawness ends.
  2. Add chopped onion in oil and sauté until they turn golden brown.
  3. Add Ginger Garlic paste and sauté for a while.
  4. Add cooked meat to a pot that was kept aside in a bowl.
  5. In a pot add roasted and crushed cumin, coriander seeds, and fennel seeds(saunf), and to give a kick of heat add chopped green chili pepper after meat and sauté them well.
  6. Ensure that the yogurt is at room temperature and whisk it thoroughly. Transfer the yogurt to a pot and mix it well. Cook the yogurt on medium-high heat until all the ingredients are well incorporated, the water reduces, and the oil separates.
  7. After the oil starts leaving the sides add prepared beef stock in a pot and mix it well so that all the components settle well.
  8. Add soaked and drained rice into the pot and stir it gently so that yakhni and rice mix well.
  9. Let it cook on a medium-high flame with a lid open until the water inside the pot starts to reduce. 

Pulao is made by simmering rice by keeping the lid open. When you find most of the water is evaporated lower the heat. You are just left with the steaming process.

Steaming Pulao Rice

  1. You will find potholes on the top layer of rice when water is evaporated. At that time lower the flame and place the tawa or griddle underneath the pot.
  2. At the top before covering the rice, add mint leaves, and food color for aromatic touch.
  3. Take a piece of kitchen towel or cotton cloth and wrap it on a lid that you are using for steaming this will help in deep steaming and help the rice to absorb the moisture.
  4. Cover the lid and steam cook for 10 minutes.

Resting;

  1. After completing the process of steaming turn off the flame and keep the lid covered  give your rice little rest for up to 15 minutes allow the rice to settle in perfection and can absorb all the remaining moisture.
  2. After 15 minutes mix the rice carefully in a gentle way. Resting them for too long will make the rice clumpy or stick to the bottom.

Take it easy!! It’s ok if you have cooked or steamed rice a little longer or a little shorter. There is enough room for these errors.

Troubleshooting:

  • As you know beef takes much time in tendering. Roaming around while making broth impatiently is not an option. Let the meat cook on low flame to be tender well with the well-flavored broth. 
  • To prevent from breaking while sautéing, Make sure meat is well cooked but not falling off the bones.
  • How much you are left with stock depends on your stove heat and the pot you use. If you find more water content in stock cook it a little longer. And if it’s not enough as much as required, add some water and give it a boil.
  • Avoid stirring rice after adding in boiling broth this will lead to breaking rice and interfere with building up the heat.
  • You just have to simmer the rice not boil them. This gives the rice time to absorb the liquid.
  • Making it covered will ruin your rice. The best option is to simmer the rice uncovered.
  • If there is too much moisture before steaming, simmer it a little longer and steam for less time to avoid breakage.
  • If you find the rice dry before steaming sprinkle some water over the top of the rice before steaming or use a wet cloth instead of a dry cloth when covering the pot for steaming rice. This will give extra required moisture to your rice.
  • Use a skimmer (a round spoon with small holes) or rice paddle while mixing or serving. Using other kinds of spoons can cause breakage to your rice kernels.

To Double The Beef Yakhni Pulao

When you have arranged a feat at your place, double the beef yakhni pulao recipe that is perfect for 8-10 people. Simply,
 
  • Double all the ingredients that are mentioned In the ingredients section except water. Increase half of the mentioned amount of water to make broth.
  • Use a large and wide pot so that the rice does not stick to each other.
  • Also, increase sauté and simmer timings for up to 3 minutes.

Making Broth(Yakhni) In Advance

Don’t you know a fun fact about broth!!!
Making broth in advance a day or two develops more deeper flavor in meat and stock. Just make it and refrigerate it. You may find some fat layer on top of the broth but don’t worry it’s the juicy extract that comes from the meat a meat fat. Let the broth come close to room temperature and the layer of fat will dissolve within.

How To Serve Beef Yakhni Pulao

Making delicious pulao is not the way to attract until it looks mouthwatering. To make it look flavorful full sprinkle some greens (mint leaves, green chili pepper slit in halves, cilantro) and yes some crunchy and crispy fried onions.

To Sevre With

Pulao has a savory flavor with less spice. Someone who is fond of spices can pair it up with Mint Raita and Garlic chutney.
Cucumber raita also goes well with pulao as a sider with its creamy texture.

Arranged a feast? Oh, well then serving pulao with a main course like Qorma or Chicken Karahi is the best option. You can also serve Shami Kebabs or Aloo Tikki as siders.

How can you forget the refreshing end of a meal, Try our Mint Margarita Recipe or Pineapple Margarita Mocktail Recipe and make meal ending sparkling.

Pulao and Zarda, the ultimate flavor fusion! Brace yourself for a taste sensation like no other. Imagine this: Pulao and Zarda, united on your plate in perfect harmony. Yes, you heard it right! Indulge your taste buds by mixing these two delectable dishes together. It may sound unconventional, but trust us, it’s a match made in foodie heaven. Don’t be shy, be bold! Give this extraordinary combo a whirl and prepare to be blown away by the explosion of flavors. 

Beef Yakhni Pulao Recipe
Print Recipe
5 from 1 vote

Pakistani Beef Yakhni Pulao Recipe

Pakistani Beef Pulao is a flavorful one-pot rice dish that combines tender beef and aromatic spices for a delicious and satisfying meal.
Total Time3 hours
Course: Main Course
Cuisine: pakis
Keyword: Pulao
Servings: 5 People

Ingredients

For Making Beef Broth

  • 1/2 KG Beef Mix Boti
  • 1 1/2 tbsp Ginger Garlic Paste
  • 1 Onion Medium Size
  • 1.5 ltr Water
  • 1 tbsp Salt
  • 10 Laung (Cloves)
  • 1 Cinaman Stick (Dar Chini)
  • 1 Bari ilaichi (Black Cardamom)
  • 1/2 tsp Black peppercorns (Kali Mirch)
  • 1/2 tsp Fennel seeds (Saunf)
  • 1/2 tbsp Coriander seeds (Sabut dhania)
  • 1/2 tbsp Cumin seeds (Zeera)
  • 2 Bay leaves (tez Paat)

To Prepare Pulao

  • 1/2 KG Basmati Rice
  • 1/2 cup Oil
  • 1 Onion Medium Size
  • 1/2 tsp Turmeric powder (Haldi)
  • 1/2 tsp Coriander seeds (Sabut Dhania)
  • 1/2 tsp Cumin (zeera)
  • 1/2 tsp Fennel seeds (saunf)
  • 3 Green chili pepper
  • 1/2 cup Yogurt (dahi)

Toppings

  • Mint Leaves (Podina)
  • Cilantro (Hara Dhania)
  • Green Chili Pepper
  • Food Color

Instructions

For making Beef Broth (yakhni)

  • 1. In a saucepan, combine water, beef, sliced onion, ginger garlic paste, and salt.
  • 2. Add a bundle of whole spices tied in a muslin cloth and cover the lid. Allow the beef to cook over low to medium heat for approximately 50-60 minutes until it becomes tender and absorbs the aromatic flavors of the spices. Alternatively, you can use a pressure cooker to expedite the cooking process, taking around 20-25 minutes to achieve the desired tenderness.
  • 3. After the meat has been properly tenderized, remove the muslin cloth containing the whole spices or take out the herb infuser, if used.
  • 4. Using tongs or a slotted spoon, carefully transfer the meat from the stock to a separate bowl and set it aside. Proceed to cook the remaining stock, allowing it to reduce until only 3 cups remain and save it for later use.

Soaking Rice for Pulao

  • 1. To ensure the rice is clean, thoroughly rinse it under running water using a strainer.
  • 2. Soak the rice in a bowl for 30 minutes, ensuring that the amount of soaking water is twice the quantity of rice you are using. This soaking time is ideal for basmati rice.
  • 3. Once the soaking process is complete, drain the rice so that all the starchy layer that was built on the rice naturally washes away. This step ensures that the rice is clean and ready for use. Set aside the drained rice for later use.

Combining Broth With Rice

  • We add whole spices in broth just to infuse them in meat. Here in Bhunai, we are roasting coriander seeds, fennel seeds, and cumin. After roasting crush them and set aside. Take green chili peppers, chop them, and keep them aside as well.
  • 1. In a pot, add oil and let it heat so the rawness ends.
  • 2. Add chopped onion in oil and sauté until they turn golden brown.
  • 3. Add Ginger Garlic paste and sauté for a while.
  • 4. Add cooked meat to a pot that was kept aside in a bowl.
  • 5. In a pot, add roasted and crushed cumin, coriander seeds, and fennel seeds (saunf) for a burst of flavor. After adding the meat, sauté them well. To add a spicy kick, incorporate finely chopped green chili pepper.
  • 6. Make sure the yogurt is at room temperature and whisk it thoroughly to achieve a smooth consistency. Transfer the yogurt to a pot and mix it well. Cook on medium-high heat, stirring continuously, until all the ingredients are thoroughly combined, the water content reduces, and the oil separates.
  • 7. Once the oil starts to separate and leave the sides, add the prepared beef stock to the pot. Mix it well to ensure that all the components are properly incorporated and settled.
  • 8. Add soaked and drained rice into the pot and stir it gently so that yakhni and rice mix well.
  • 9. Let it cook on a medium-high flame with a lid open until the water inside the pot starts to reduce. 

Steaming Pulao Rice

  • 1. As the water evaporates, you may notice small holes forming on the top layer of rice. When this happens, lower the flame and place a tawa or griddle underneath the pot to prevent the rice from sticking to the bottom.
  • 2. Before covering the rice, add a handful of fresh mint leaves on top for an aromatic touch. You can also sprinkle some food color to enhance the visual appeal of the dish.
  • 3. Take a piece of kitchen towel or cotton cloth and wrap it around the lid that you will be using for steaming. This will facilitate deep steaming and aid in the rice absorbing the moisture effectively.
  • 4. Cover the lid tightly and steam cook the rice for approximately 10 minutes.

Resting

  • 1. After completing the steaming process, turn off the flame and keep the lid tightly covered. Allow the rice to rest for about 15 minutes. This resting period helps the rice to settle and absorb any remaining moisture, resulting in perfectly cooked and fluffy rice.
  • 2. After the 15-minute resting period, gently fluff the rice using a fork or a spatula. Be careful not to overmix, as it can make the rice clumpy or stick to the bottom. The aim is to separate the grains while maintaining their light and fluffy texture.

FAQs

Beef Yakhni Pulao is a traditional dish in Pakistan. It is made by combing beef broth in rice with multiple spices. Its nutty color and flavors makes it unique.

Using the waist part of beef is best for cooking Pulao.


Yes, you can use if you have pre-packaged or homemade beef stock.

After separating the meat from the broth cook it until it is left 3-4 cups if you are using 1/2 kg meat.

Using long-aged basmati rice is the best choice to cook pulao. It will be ok if you are using short-aged basmati.

Pulao rice is cooked by simmering and steaming. If you overcook rice while simmering it will definitely get mushy. To avoid turning your rice mushy, measure the water content while adding rice to boiling stock. Water must be more than rice but not more than 2nd phalanx of your index finger. This ratio is exact for making perfect pulao rice

The authentic beef yakhni pulao recipe does not include any kind of vegetable. Afghani pulao ( kabuli pulao ) is made with multiple vegetables and nuts.

You can make it in both ways either in a pressure cooker or in a pot.

If you are making broth in a saucepan make sure to cook it on a low flame no matter if it takes more time to cook. Try not to interfere with heat by opening the lid again n again.

Beef yakhni pulao tastes yum honestly if made in advance. It deepens the flavor more in meat.

Mint leaves, cilantro, and crispy fry onions goes well for topping pulao.

Store leftovers in air tight container in your refrigerator. You can refrigerate it for up to 3 days. To reheat sprinkle some water on the rice this will make steam and keeps your rice fluffy.

You can adjust spice level according to your taste buds.

You can double the recipes. Simply double all the ingredients but not water. It will take half to the given amount.

Pakistani Chicken Karahi Recipe (Authentic & Simple)

Pakistani Chicken Karahi Recipe

Chicken karahi is a dish that has been around for years and is loved by people all over the world. With its unique blend of spices and flavors, it has become a favorite among many. The popularity of this dish has led to the creation of countless recipes, but not all of them are created equal. Many can be difficult to follow or require hard-to-find ingredients.

If you’re looking for a chicken karahi recipe that is both delicious and easy to follow, look no further. This restaurant-style Pakistani chicken karahi recipe is the perfect option. Made with simple ingredients that you can easily find in your local grocery store, this recipe is quick and hassle-free. You can whip up this delicious curry in no time, impressing your friends and family with your culinary skills.

So, If you’re in the mood for a flavorful and satisfying chicken dish, give this recipe a try. Your taste buds won’t be disappointed!

What Is Chicken Karahi?

Chicken karahi is a dish that is famous for its bold and spicy flavors that will surely tantalize your taste buds. This dish holds a very special place in South Asian cuisine and is particularly renowned in Pakistani and North Indian cuisine. Legend has it that this dish was originally cooked in a wok-shaped pan called a “karahi” over an open flame.

The authentic chicken karahi recipe has a rich tomato base with an abundance of fragrant spices such as black pepper, green chili peppers, cilantro, silvers of ginger, and dried fenugreek leaves, giving it a unique and bold taste that is hard to resist.

If you’re a fan of spicy meals, then chicken karahi is a must-try. And if you want to experience its true essence, then be sure to savor this dish cooked in a karahi, as it will bring in that unmatched smoky flavor that will take this delicacy to a whole new level.

Chicken Karahi Ingredients:

  • Oil 1 Cup
  • Onion 1 medium size
  • Chicken (karahi cut) 1 KG
  • Chopped Garlic 4-5 cloves.
  • Tomatoes 5-6 medium size
  • Green chili pepper 4-5
  • Coriander (dhaniya) powder  2 Tsp
  • Red chili powder 1 Tbsp
  • Crushed red chili 1 Tbsp
  • Salt 2 Tsp or to taste
  • Turmeric powder 1/2 Tsp
  • Yogurt 1/4 Cup
  • Ground black pepper 1 Tbsp
  • Crushed cumin 1 Tsp
  • Garam masala 1/2 Tsp
  • Crushed whole coriander 2 tsp
  • Dried fenugreek leaves 1/2 tsp
  • Ginger Julien cut 1-2 Tbsp
  • Cilantro chopped 1-2 Tbsp

How To Make Chicken Karahi?

Although there are various ways of making chicken karahi, here you will find the simplest way to make it.

1. Add Oil To A Pan

Add oil to a pan and heat it until the rawness of the oil is gone. You can add more oil or ghee if you desire a restaurant-style finish.

2. Add Onions

Add finely chopped onions to a pan and sauté them until the color turns light golden. Pakistani chicken karahi does not include onions, but if you can’t get enough of karahi masala, adding a small amount of onion can help produce a good amount of gravy. Although, adding onion is totally optional and up to your choice.

3. Add Garlic

Add chopped garlic to the pan after the onion turns golden brown. Saute it until the garlic also turns golden brown in color. Alternatively, you can use garlic paste, but adding chopped garlic gives a delicate flavor.

4. Add Chicken

Firstly, add chicken to a pan and sauté until it turns white in color. Then, mix it well. At this point, adding turmeric powder will give some color to the chicken.

5. Add Tomatoes

Now comes the step of adding tomatoes cut in halves and putting them in a pan. Cover the pan and make sure to cook on low flame for 10-15 minutes, or until the tomatoes are tender. 

Once the tomatoes have been tendered, remove the skin and mix well. The moisture coming from the tomatoes will be enough to cook chicken. You can add a small amount of water if required.

6. Add Spices

Now, add red chili powder, crushed red chili, salt, and coriander powder. Mix them well, then cover the lid and cook for a minute or two on low heat for a well-developed flavor. Remove the lid and stir-fry over high heat until the oil separates.

7. Add Yogurt

After the oil separates, add yogurt at this point and continue to cook it until the oil starts leaving the sides of the pan again.

8. Steaming

Finish off by adding green chili pepper cut in halves, garam masala, ground black pepper, and dried fenugreek leaves. Mix them well and let them cook over low flame for 4-5 minutes. After that, turn off the flame and your chicken karahi is ready to be served on the table.

Pro Tips:

  • The most important thing to keep in mind while making chicken karahi is not to use a small/narrow pan as the chicken will not cook and will not pick flavor evenly. So as not to ruin your efforts, always use an open stirfry or wok-style pan. 
  • Even though water is used in chicken karahi as the moister released from tomatoes is enough to cook the chicken but still, if the chicken is rough you can add a little amount of water to cook it properly.
  • Use whole milk yogurt at room temperature and whisk it properly to prevent it from cuddling in curry.
  • Make sure not to stir the spatula unnecessarily, this will result in breaking the chicken.

Pakistani Chicken Karahi Recipe

If you're in search of a chicken karahi recipe that is not only tasty but also simple to follow, your search ends here. This Pakistani chicken karahi recipe is an ideal choice.
Total Time45 minutes
Course: Main Course
Cuisine: Pakistani
Servings: 6 People

Ingredients

  • 1 cup Cooking Oil
  • 1 Onion Chopped
  • 1/2 KG Chicken
  • 4-5 Garlic Chopped
  • 4-5 Tomatoes
  • 4-5 Green Chili Pepper
  • 2 tsp Coriandor (Dhaniya) Powder
  • 1 tbsp Red Chili Powder
  • 1 tbsp Red Chili Crushed
  • 2 tsp Salt
  • 1/2 tsp Turmeric Powder
  • 1/4 cup Yogurt
  • 1 tbsp Ground Black Pepper
  • 1 tsp Crushed Cumin
  • 1/2 tsp Garam Masala (Hot Spices)
  • 2 tsp Crushed Whole Coriander
  • 1/2 tsp Dried Fenugreek Leaves
  • 1 tbsp Ginger Julien Cut
  • 1 tbsp Cilantro Chopped

Instructions

  • Pour oil into a pan and allow it to heat until the rawness of the oil dissipates. If you prefer a more restaurant-style outcome, feel free to add additional oil or ghee to your liking.
  • Sauté finely chopped onion in a pan until golden. Onion is not a traditional ingredient in Pakistani chicken karahi but adding a small amount can enhance the gravy. It's optional.
  • Once the onions are golden brown, add chopped garlic to the pan and sauté until it turns golden too. While you can use garlic paste, chopped garlic adds a delicate flavor.
  • Add the chicken to the pan and sauté it until it turns white. Ensure that it is well mixed. At this point, adding Turmeric Powder will give the chicken a hint of color.
  • Add halved tomatoes to the pan, cover, and cook on low heat for 10-15 minutes until tender. Remove the skins, mix well, and let the moisture from the tomatoes cook the chicken. Tomatoes moisture is enough to cook chicken. If required, a small quantity of water can be added.
  • Add Red Chili Powder, Crushed Red Chili, Salt, and Coriander Powder. Mix well, cover, and cook on low heat for a minute or two to enhance the flavor. Uncover and stir-fry on high heat until the oil separates.
  • Once the oil separates, introduce yogurt to the mixture and continue cooking until the oil begins to separate and accumulate on the sides of the pan once more.
  • To complete the dish, add halved green chili peppers, Garam Masala, Ground Black Pepper, and Dried Fenugreek Leaves. Mix everything thoroughly and allow them to cook on low heat for 4-5 minutes. Once done, turn off the heat, and your flavorful chicken karahi is ready to be served on the table.

Notes

For optimal results in a chicken karahi, use an open stir-fry or wok-style pan to evenly cook and flavor the chicken. While water is typically unnecessary, a small amount can be added if needed for tougher chicken. Use room temperature whole milk yogurt and whisk it well to prevent curdling. Avoid excessive stirring to prevent breaking the chicken pieces.

FAQs

Yes! Chicken Karahi is one of the most popular dish in and out of Pakistan. Notable in Indian and Pakistani cuisine.

Chicken Karahi can be served with Naan, Raita, Onion rings and salad.

Pulao and Biryani are the best combinations that can be served with Chicken Karahi as a side dish.

Yes you can use ghee instead of cooking oil or you can use both as well ghee will give your dish some smooth texture.

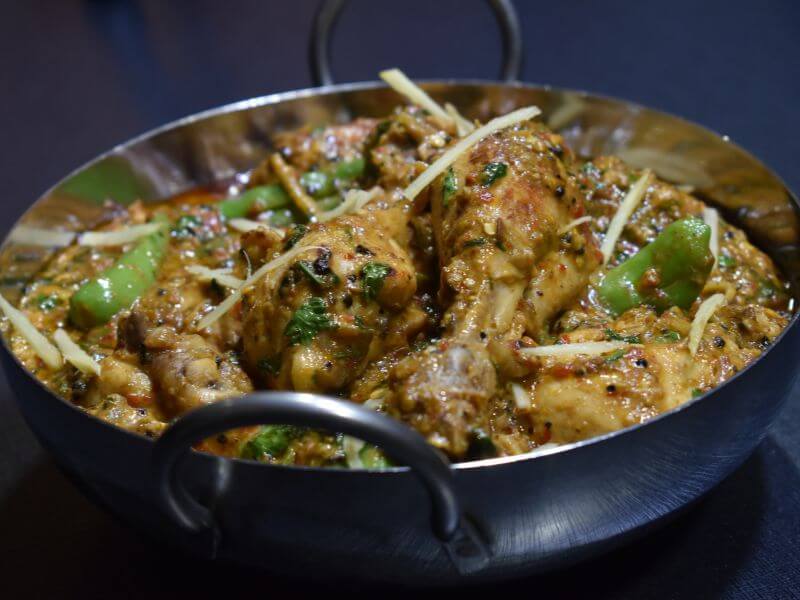
Green chili pepper, heavy use of black pepper and Ginger julienne are the best toppings of Chicken Karahi that enhance the flavour and aroma of the dish.

Its totally up to you if you want to use Thigh, Breast, Bone-in or Bone less chicken.

Chicken Karahi is notable due to its spicy taste. The dish is prepared in a type of wok in open fire, Green Chili Pepper and Black Pepper are key ingredients of Chicken Karahi.

Chicken Karahi is undoubtedly most famous dish in Pakistan and people prefer it more in restaurants.

Chicken karahi is native from Khyber Pakhtoonkhwa which basically gives the sense of heavy use of meat and black pepper but with the passage of time people have started making it in different ways.

Chicken Karahi is a dish full of flavor that can be prepared easily with no finicky steps and commonly served on festivals or some special occasions.

Cooking Chicken in an open pan or wok on open fire basically stir frying technique is the best way to cook Chicken karahi.

Chicken karahi can be prepared easily without any obstacles. 45 min is the max time for cooking.

Chicken karahi can be prepared in advance and can be reheat easily make sure to add little amount of water while reheating the dish.